Image to Figma: How to Convert Any Image into an Editable Design
"Image to Figma" means converting a flat image — an AI-generated illustration, a screenshot, a photo composite — into a Figma file where every element is a separate, editable layer. Dragging a PNG onto the canvas only imports it as pixels; real conversion decomposes the picture into text, subjects, backgrounds, and decorations you can edit independently.
This guide covers how that conversion works under the hood — the research behind AI layer decomposition — and how to run it on your own images.
Why This Became Every Designer's Problem
Over 15 billion AI images were created in the first 15 months of the text-to-image era — roughly 34 million per day, according to Everypixel's research. Adobe's 2025 survey of 16,000 creators found that 86% now use generative AI in their work.
Generation takes seconds. Editing takes hours: the moment the image needs a different headline or a client's brand colors, you're manually tracing elements and rebuilding the composition in Figma. Image-to-Figma tools exist to close that gap — keep the speed of generation, restore the editability of a real design file.
How Image-to-Figma Conversion Works
The key insight behind image-to-Figma conversion: flat images are hard to edit because everything is glued onto one single canvas. Touch one element and you risk smudging everything around it. The fix isn't better editing tools — it's taking the picture apart into layers first, then editing each layer on its own.
Here's what happens when you convert an image, in plain terms:
-
The AI "reads" the picture. It scans the image and works out what it's made of: this part is a headline, that's the main subject, that's the background, that's a decorative glow.
-
Each element gets its own transparent layer. The AI doesn't cut the picture apart like scissors — it repaints every element onto a separate transparent sheet, like layers of stacked film. Crucially, where elements overlap, the layer underneath keeps the parts hidden behind the subject. Nothing gets lost.
-
The layers must rebuild the original. Stack the layers back together and they should reproduce the original image, pixel for pixel. Better alignment here is exactly why you can move, resize, or recolor any layer while everything else stays exactly as it was.
From Layers to Figma: The Layera Workflow
Layera applies this research end to end:
-
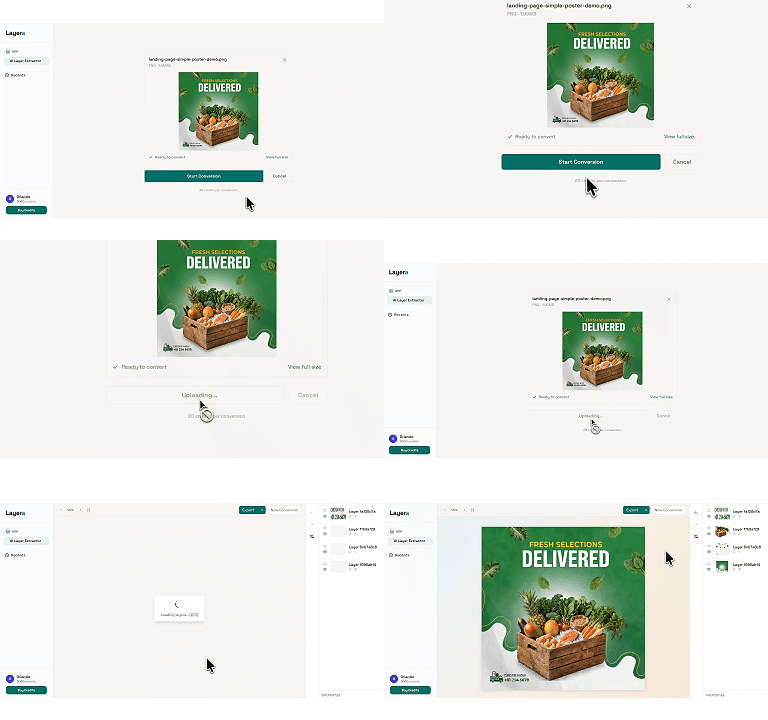
Upload the image — PNG, JPG, or WebP up to 10MB, from any source: ChatGPT, Midjourney, Gemini, photos.
-
Let the AI extract layers — the decomposition model outputs individually named layers: text, subjects, backgrounds, decorations.
-
Push the layers into Figma — with the Layera Figma plugin, layers land directly on the canvas as editable objects. You can also export to PowerPoint.
For a deeper walkthrough, see our AI layer extractor guide.
Tips for a Clean Conversion
- Start with the highest resolution you have — more pixels give the model clearer boundaries.
- Prefer PNG over JPG — compression artifacts blur edges and degrade separation.
- Pick images with distinct elements — clear subjects and readable text convert far better than abstract blends.
- Plan a refinement pass — treat the output as a strong draft; fix layer names and nudge boundaries rather than expecting pixel-perfect results.
Getting Started
- Open Layera and upload your image.
- Let the AI extract the layers (a conversion costs 20 credits).
- Import them into Figma with the plugin.
Layera is pay-per-use with no subscription — the Starter pack is $1 for 80 credits (about 4 conversions), and credits never expire.
FAQ
How do I convert an image to Figma?
Use an AI image-to-layer converter like Layera: upload a PNG, JPG, or WebP, let the AI separate the image into text, subject, and background layers, then send the layers straight into Figma with the Layera plugin. The result is an editable design, not a flat picture.
How does AI image-to-Figma conversion work?
The AI scans the image to recognize its elements — text, subjects, backgrounds, decorations — then repaints each one on its own transparent layer. Stacked together, the layers reproduce the original image, so each element can be edited independently.
How do I import an image into Figma?
Drag and drop the file onto the Figma canvas, or use Shift + Cmd/Ctrl + K to place it. Importing embeds the image as a single flat layer — it does not make individual elements editable. Converting the image into layers requires an AI conversion tool or manual rebuilding.
Can Figma convert an image to editable layers natively?
No. Figma can import, crop, mask, and apply adjustments to an image, but it cannot decompose a flat image into editable text, shapes, and objects. You need a plugin or an external converter for true layer separation.
What image formats can I convert to Figma?
Most converters accept PNG, JPG, and WebP. PNG is recommended because it avoids JPG compression artifacts, giving the AI cleaner boundaries to detect. Layera supports files up to 10MB.
Is converting an image to Figma free?
It depends on the tool. Layera uses pay-per-use credits with no subscription: the Starter pack is $1 for 80 credits — about 4 image conversions — and credits never expire.
Related Posts
Ready to extract editable layers?
Upload any AI-generated image and get a layered design file in seconds.